
In chemistry, we deal with chemicals, when we do a reaction to produce the desired product it may be mixed with other byproducts or impurities. In order to separate different substances from each other, we follow some separating techniques.
Also, we need to identify different types of substances, for which we also follow some tests. This blog would discuss some separating and analysis techniques which you may find helpful.
In this blog, I am going to explain each of the separation techniques in detail. But if you feel need to learn even more details then I would recommend you have a look at his book “Cambridge IGCSE® Chemistry Practical Workbook (Cambridge International IGCSE)” on Amazon.
Separating different types of mixtures
Separating the mixture of sand and salt
Sand and salt, when mixed together, can be very hard to separate. But with some proper steps separating them can be extremely easy. They can be separated due to the fact that salt is soluble in water while sand is not.
Take the mixture of sand and salt in a beaker, then add water and stir. The salt will dissolve in water while the sand will not, the sand will remain at the bottom of the beaker.
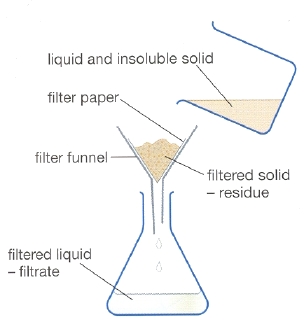
Then the sand can be separated from the salt solution with the filtration procedure as shown in the diagram below. The sand will get stuck in the filter paper. The solid sand collected in the filter paper is known as the residue while the salt solution which passes through the filter paper to be collected is known as filtrate.
The salt in solid form can be obtained from the salt solution by simple heating to boil off the water or by a procedure known as simple distillation. In simple distillation, the water can be collected.
Separating the mixture of salt and water
Salt and water are separated by a process called Simple Distillation. The concept behind is that both salt (Sodium Chloride) and water have different boiling points. Water has a boiling point of 100◦C while salt has a boiling point of 801◦C. The simple distillation is carried out by the apparatus shown below
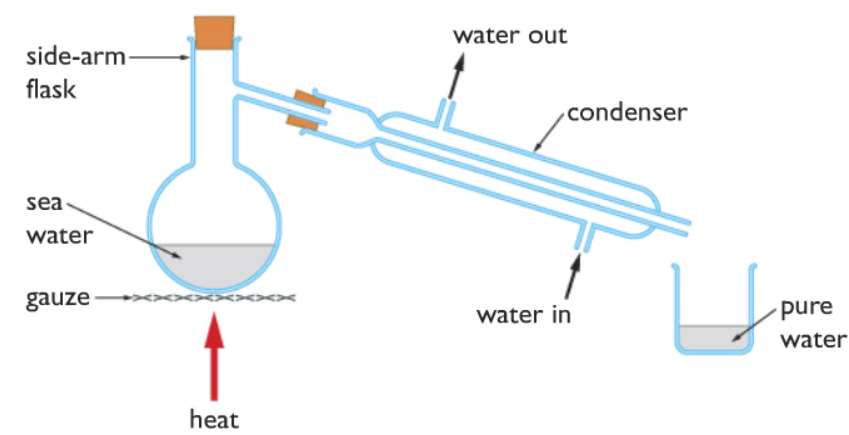
The mixture of salt and water, which is labeled as sea water here is taken in a sidearm flask and heated. When the temperature inside the flask reaches 100◦C, the water boils, it completely turns to steam. The hot steam escapes from the side tube when the steam passes through the condenser, it is cooled down to liquid water which collects in the beaker.
The condenser cools down the steam with the help of cold water. The water goes in the condenser from the bottom and comes out from the top, the flow of cool water around the steam cools it down. The bottom to top direction of water flow ensures efficient cooling. If the water went from top to bottom then gravity would have taken part in it, the water would have flowed down very quickly form packets of air and causing inefficient cooling.
While water gets collected in the beaker, the salt (sodium chloride) which is an ionic compound with a very high melting point of 801◦C remains behind. The salt can be simply collected after all the water has boiled off.
Separating the mixture of ethanol and water
Ethanol and water are miscible, which means they are completely soluble with each other, also they are both transparent. They can be separated due to their different boiling points. Ethanol has a boiling point of 78◦C while water has a boiling point of 100◦C. Unlike salt and water, their boiling points are quite close.
Therefore in order to separate ethanol and water a more careful approach is needed. Hence, they are separated by a more advanced distillation called fractional distillation. Please view the apparatuses used for fractional distillation below.
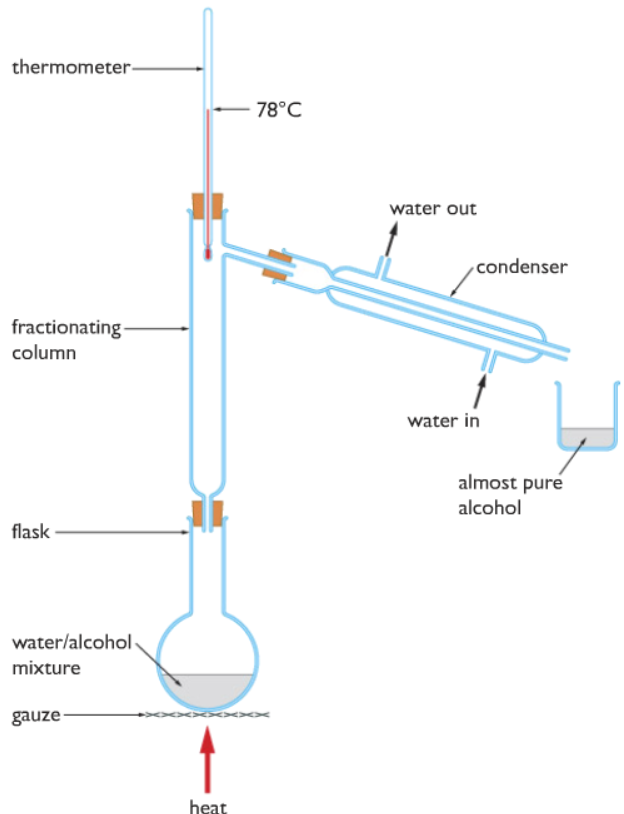
From the diagram above you can clearly see the differences between the apparatuses used in fractional distillation and simple distillation. Two further apparatuses are added, they are the fractionating column and the thermometer. The fractionating column contains small glass beads, I will explain in detail for the need of glass beads below.
The mixture of ethanol and water is taken in a sidearm flask, then heat is applied. When the temperature reaches 78◦C which we will be seeing in the thermometer, all the boils and turns to gas. But along with ethanol, some water evaporates too. When the ethanol gas and some gaseous water is traveling through the fractionating column, water not which has not reached its boiling point of 100◦C, condenses when comes into contact with the glass beads inside. While ethanol has reached its boiling point of 78◦C and does not condense, travels through the fractionating column, through the delivery tube, cooled by the condenser which turns it into liquid and collects in the beaker. Please refer to the simple distillation process if you are confused about how the condenser works, it is explained in detail over there.
Separating oil and water
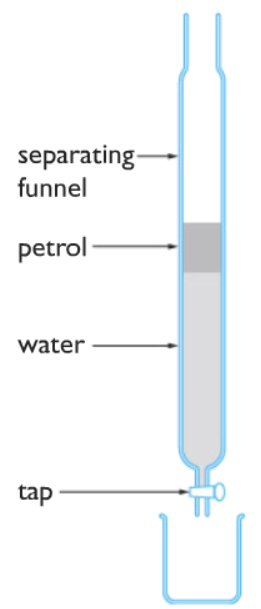
Oil and water can be easily separated due to the fact that they are not soluble with each other. Oil is less dense than water and floats above the surface of the water. Oil and water can be separated by using a simple apparatus called separating funnel. The tap is opened, the water flows and gets collected in a beaker. The oil remains behind in the separating funnel.
Separating different colored pigments of ink
A black ink which may appear to be a made out of a single colored substance may not be true. A black ink may be made out of several colored pigments such as purple, yellow, red to make up the black color.
To see what colored pigments are present in a sample of black ink we do a simple experiment called paper chromatography. There are also other types of chromatography such as High-Performance Liquid Chromatography (HPLC), but for the time being, we are just going to have a look at paper chromatography to understand the core concept.
The arrangements of apparatuses used for paper chromatography are shown below
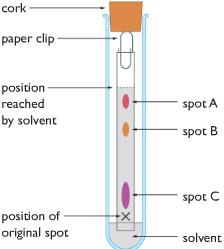
A test tube is taken, and narrow strip of paper is taken. At one end of the narrow paper strip, a spot is marked with X, then on the X a small amount of black is dropped. Now dip that end of the strip in water (solvent), BUT BE CAREFUL NOT TO DIP THE SPOT X, OTHERWISE THE INK ITSELF WOULD DISSOLVE IN THE WATER.
The water travels upward through the paper, while traveling upwards different colored pigments in the black in dissolves in the water and travels with it.
The different colored pigments are different substances, each one has different solubility in water. The most soluble pigment travels the furthest along with water, while the least soluble substances travel the least with water.
In the diagram, we can see that the black ink is made out of three colored pigments, purple, yellow and pink. According to the concept, the pink pigment should be most soluble as it travels the furthest while the purple one would be least soluble as it travels the least distance. The yellow color has medium solubility.
Collecting different types of gases
In a reaction, different types of gases may be produced, and we should know the proper methods to collect each of the gases. We mainly collect gases based on two properties, their density compared to air and their solubility in water.
|
Method of Collection | Type of gas |
|
Downward delivery: 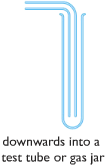
| To collect gases which are denser than air. |
| Upward delivery:
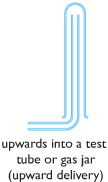
| For collecting gases less dense than air |
| Overwater:
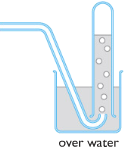
| For collecting gases which are insoluble in water. |
| In a gas syringe:
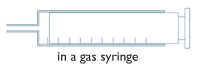 | For collecting and measuring the volume of a gas. |
Below stated are examples of how different gases are collected due to their physical properties
| Gas | Method |
| Hydrogen | Overwater/upward collection (because hydrogen is less dense than air)
Test: Hydrogen relights a glowing splint with a pop sound. |
| Oxygen | Overwater ( almost same density as air, slightly soluble in water)
Test: Oxygen relights a glowing splint |
| Carbon dioxide | Downward collection/over water(denser than air, slightly soluble in water)
Test: turns lime water milky |
| Chlorine | Upward collection (less dense than air, highly soluble in water.
Test: turns damp/moist blue litmus paper red then bleaches it. |
| Ammonia | Upward collection (less dense than air, extremely soluble in water so not collected over water)
Test: turns moist/damp red litmus paper blue. |
Testing for the presence of water
This test is strictly to show whether water is present in a liquid or not, not to show whether the water is pure or not. For example, for a transparent cold drink like sprite, this test would be positive, because it contains water. But this test would be false for something which looks like water but is not water, for example, pure ethanol.
so whats the test and result? Don’t worry I am writing it down below for you.
Test: Take some powdered Anhydrous Copper(II)Sulfate (CuSO4 ), its color would be white. Then add a few drops of the liquid you want to show whether water is present in it or not.
Result: If a given liquid contains water, then it would turn the white Anhydrous Copper(II)Sulfate to blue
Wait! But Why!?
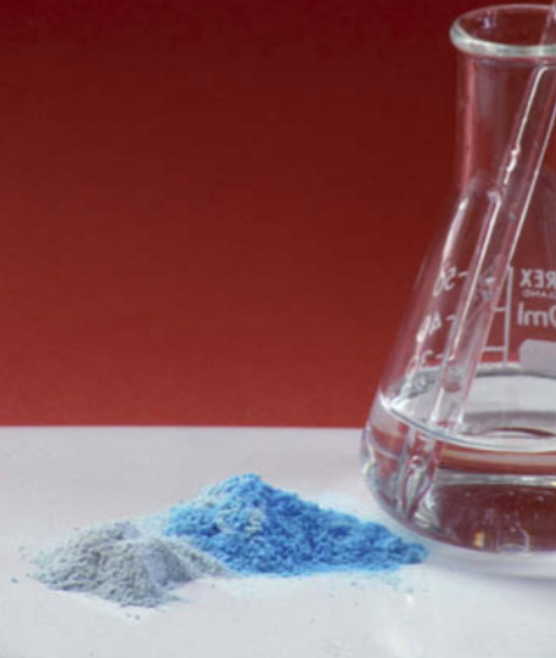
Anhydrous copper(II) sulfate (CuSO4 ) do not have any water of crystallization, its color is white. But when a substance containing water is added to copper(II)sulfate, it absorbs water to form water of crystallization. It then turns to Hydrated copper(II) sulfate ( CuSO4.5H2O ) which is blue in color. The full equation with state symbols is shown below:
CuSO4(s) + 5H2O (l) → CuSO4.5H2O(s)
What is the flame test and why it is carried out?
The flame test is a test done to detect cations. The cation is identified by the flame color. Not all cations show a flame color, we are going to learn about the cations which do show flame color.
The table below lists downs the color which some cations show:
| Ion | Flame color |
| Li+ | red |
| Na+ | orange |
| Ca+2 | Orange-red |
| K+ | Lilac/pink |
How to perform the flame test?
In order to perform the flame test, we take a sample salt on the tip of a clean nichrome wire, then hold it in the blue part of the bunsen burner flame. The color of the flame corresponds to which cation is present.
Using NaOH solution to detect positive ions
Positive ions can also be detected with the help of NaOH (Sodium Hydroxide) solution. The cations are identified by the color of the end precipitate. Different cations form precipitates of different colors.
Test: The test is done by adding NaOH solution to each sample. The table below lists the color if each precipitate and the corresponding cation.
| Ion | Precipitate color |
| Cu+2 | Blue precipitate formed.
Cu+2(aq) + 2OH –(aq) → Cu(OH)2(s) E.g: Positive result for CuSO4 solution |
| Fe+3 | Orange brown precipitate formed
Fe+3(aq) + 3OH–(aq)→ Fe(OH)3 (s) E.g: positive result for Fe2(SO4)3 solution |
| Fe+2 | Green precipitate formed
Fe+2(aq)+2OH–(aq)→ Fe(OH)2(s) E.g: positive result for Fe(NO3)2 solution |
| NH4 + | No precipitate formed, but ammonia gas release( which turns moist red litmus paper blue)
NH4+(s or aq) + OH–(aq)→ NH3(g) + H2O(l) E.g positive result for NH4NO3 solution |
Testing for CO3-2(carbonate) ion
Test: Add dilute nitric or hydrochloric acid
Result: if carbonate ion is present then there would be fizzing or effervescence of invisible gas.
Wait! But why!?
Carbonate ions react with the hydrogen ions in the acid, forming water and gaseous carbon dioxide as products The carbon dioxide gas causes fizzing or effervescence. Look at the reaction below:
CO3-2(s or aq) + 2H+(aq)→ CO2(g) + H2O(l)
Note: Na2CO3 (Sodium Carbonate) solution is used as a source of carbonate ions.
How can I be sure that the gas released is carbon dioxide and not any other gas?
Test the gas evolved with Lime water (Calcium Hydroxide solution), if it turns the lime water milky then the gas evolved in carbon dioxide.
Testing for SO4-2(sulfate) ion
Test: add dilute hydrochloric acid (to destroy any carbonate which will also the same result) followed by barium chloride solution
Result: if sulfate ion is present then a white precipitate would be formed
The white precipitate is formed due to barium ion combining with the sulfate ion.
Ba+2(aq) + SO4-2(aq) → BaSO4(s)
Testing for halide ions
Test: firstly add dilute nitric acid to destroy any carbonate ions present which may interfere and produce similar results, followed by silver nitrate solution. Following results for each of the halide ions are listed in the table below:
| Ion | Result |
| Cl– (chloride) | White precipitate formed
Ag+(aq)+Cl–(aq)→ AgCl(s) A positive result for NaCl solution |
| Br–(bromide) | Pale cream precipitate formed
Ag+(aq)+Br–(aq)→AgBr(s) A positive result for KBr solution |
| I–(Iodide) | Yellow precipitate formed
Ag+(aq)+I–(aq)→ AgI(s) A positive result for NaI solution |
Very useful website, all the contents given as per examination requirement equally good for students and teachers.